A thin line separates a good mix from a great mix.
Great mixes are balanced, with a powerful low-end and brilliant highs. They’re musical, and breathe in time with the tempo of the song. Great mixes are controlled, with just the right amount of punch and sustain, are colorful and bursting with character, and have a depth that seems to extend beyond even the speakers themselves.
So what’s the secret? How do some engineers make their mixes seem larger than life? The key is shifting your focus from the individual tracks to the whole of the song. And it all goes down on the mix bus—the stereo output channel you should set up with a few processors.
Create a Mix Bus
The first tip to mix bus processing is actually setting up a mix bus. To make a mix bus, simply create a stereo aux channel and route all of the other channels in your session through it. If you’re already using busses for other channels (like a drum bus, vocal bus, FX bus, etc.), just route the output of the busses to the mix bus.
The mix bus allows you to add processing to the song as opposed to the individual channels. The key is to do it subtly—too much processing on the mix bus can ruin it. Make sure you’re using mix bus compression, EQ, and other processing to enhance the song, as opposed to correcting problems within the tracks themselves.
One great approach is to apply your mix bus processing at the beginning of the session, rather than the end. By applying processing early, it allows you make mix decisions based on what the end product will sound like. If you wait to start until the song's individual tracks are mixed, it will be much harder to maintain the balance you've created.

Make Your Equalizer Smile
To get those powerful lows and brilliant highs that great mixes need, many mixing engineers use an equalizer on the mix bus. As that old saying goes, make your equalizer smile and the world smiles with you.
By applying a smile-like EQ curve to the mix bus instead of each individual track, you run less risk of frequency build-ups and phase problems that can occur from stacking multiple EQs.
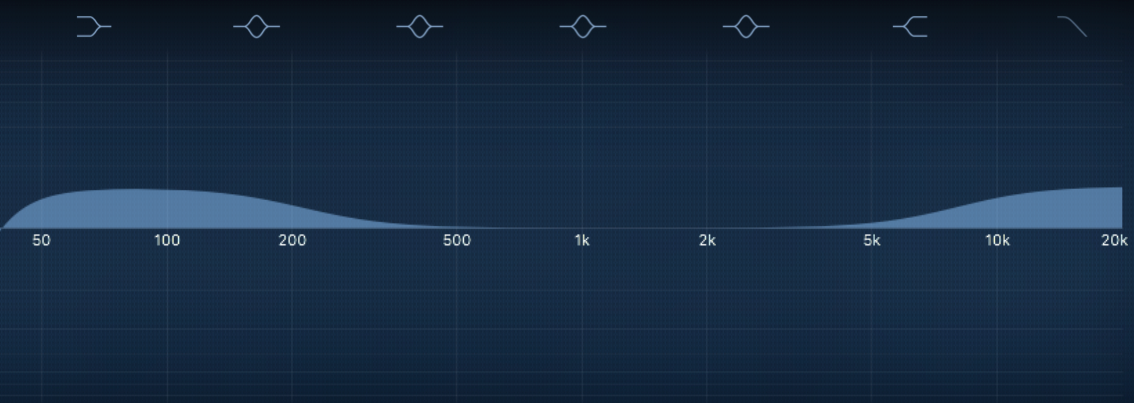
Start by boosting the bottom end (usually below 200Hz) with a low shelf. The exact frequency and amount of boosting you do will depend on the track, but typically gain adjustments are kept under 3dB. You may also want to apply a high-pass filter around 20Hz or 40Hz to roll-off the subs.
Next, boost the top-end (usually above 8kHz) with a high shelf to taste. This should help bring out the sparkle and “air” in your recordings. This EQ can also be used to correct minor frequency imbalances, though most adjustments here should be subtle.
Let Your Bus Compressor Breathe
To get your mixes to breathe in time with the tempo of the song, try using subtle compression on the mix bus.
Use low ratios (usually around 2:1), and only apply between 1dB and 3dB of compression during the loudest parts of the song. Applying compression on the mix bus helps “glue” all of the tracks together and make them feel like they’re working in sync with one another.
Pay special attention to the attack and release times as well. Typically, slower attack times are used for a more natural, subtle sound.
The bus compressor will need special attention. As you get further into your mix, keep checking back on your bus compressor and tweak the settings as needed. Make sure you’re not hitting it too hard (that is, with too much incoming signal), which could result in over-compressing.
Pay special attention to the attack and release times as well. Typically, slower attack times are used for a more natural, subtle sound. If the attack is set too fast, it will compress too quickly and cause an unnatural clamping sound. Similarly, if the release time is too fast it can cause “pumping,” and if it’s too slow it can suck the life out of your mix.
A simple technique is to start with the slowest attack setting and slowly increase it until you start to lose the attack of the transients, then back off a bit. Similarly, start with a fast release setting, and slowly decrease it until the compressor begins working in time with the song. The gain reduction meter should almost return to 0 just before the downbeat.
This creates that magical breathing effect that makes a mix come to life.
Give The Low-End a Bear Hug
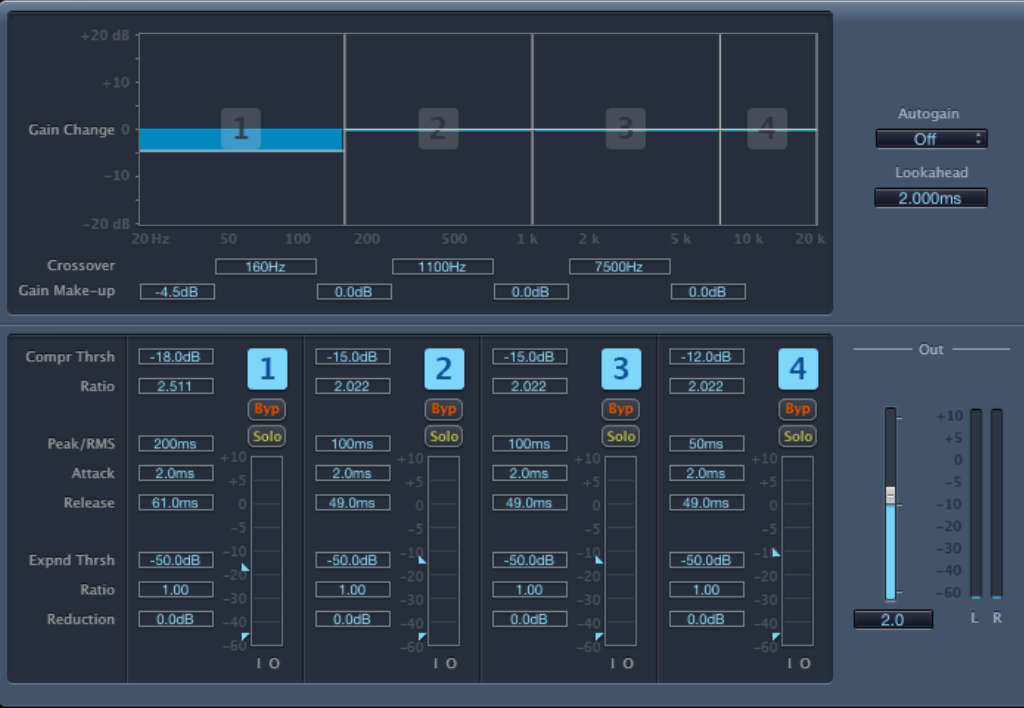
To get just the right amount of punch and sustain, especially in the low-end, a multiband compressor can be incredibly helpful.
Try using a multiband compressor to squeeze everything below 200Hz or so, depending on the track. Keep the gain reduction below 6dB, and use the makeup gain to compensate for level loss. This helps glue together the low-end of bass guitars, kick drums, 808s, and synthesizers without affecting all of the character in the high frequencies.
By applying this technique at the beginning of the mix you can push the bass instruments against the bus compressor. If set properly, the bass will thunder when it’s played, without being too loud or adding unnecessary bass boosts to the mix bus.
Multiband compressors can also be used as “dynamic equalizers” to tame frequency build-ups on the mix bus. Just be careful not to use it to fix a problem that could have been solved on a single channel.
Get the Rich, Vintage Vibe with Saturation
There’s something about the harmonics added by analog circuitry—and the saturation caused by analog clipping—that makes a record sound a little more human. If you use saturation correctly, your mixes will be colorful and burst with character.
One way to recreate the effect of tape and tube saturation is by using analog emulations on the mix bus. Many plugin manufacturers offer console emulations, which recreate the summing effects of busses on analog consoles.
Tape machine emulations also offer a unique vintage analog flavor. While many classic recordings were done on 2” tape machines like the Studer A800, the stereo mix was printed on a smaller machines (typically 1/2”) like the ATR-102.
This introduces another layer of harmonics and saturation, which can make a mix sound fuller and richer. If you don’t have console or tape emulation plugins, any subtle form of saturation can achieve a similar effect.

Use Subtle Stereo Enhancement Plugins
While depth is mostly achieved through effects sends to reverb and delay units, the mix bus can help open your mix up even further.
Many engineers like to include stereo enhancement plugins on their mixes to help make the whole mix feel a little wider. By using phase manipulation and psychoacoustics, these plugins can help spread your mix across your left and right channels.
Just be careful—these plugins can quickly jeopardize mono compatibility, so frequently check your mixes in mono to make sure nothing disappears.
Keep It Interesting with Automation
To keep a listener’s attention, your mix should change over time. One of the simplest ways to achieve this is to use automation on the mix bus.
You can automate the volume of the chorus up 1dB or the bridge down a couple dB to make that last chorus really explode out of the speakers. It’s OK if the intro is quieter than the rest of the song—that’s what makes the first verse feel bigger.
Volume isn’t the only thing you can automate, though. Try toggling different effects on and off during different sections. Try using three or four subtly different delays and reverbs. Try changing EQ or compression settings. Try making the third verse mono. Automation lets you change literally any parameter available, so use it to keep your mix interesting.
A thin line separates a good mix from a great mix. The key is to focus on the song as a whole. Implement these mix bus tips at the beginning of your next session and let us know if it helped you make your mix larger than life.