Judging by the number of new major label LP releases — and the reported backlog at mastering plants — the rediscovery of vinyl is no longer the domain of elite collectors.
As frequent Stereophile contributor and longtime vinyl evangelist Ken Micallef explains, the resurgence in vinyl is about the complete experience vinyl offers as well as hearing and feeling the music in the room. And, he says, getting the full impact of that experience requires some effort.
“Vinyl takes more work, but it provides better results,” he explains.“‘Kids—age 15 to 30—love the packaging, like older generations did. It gives them something to look at while they listen. The market gets bigger and bigger, and contrary to all naysayers, whom I call ‘vinyl deniers,’ the trend gets bigger every year.”
By more work, Micallef doesn’t just mean the physical effort of having to get up to turn over a record. To get the best results, it’s important to set up your turntable and keep the albums themselves in optimal condition.
Unlike CDs, MP3s, and other digital formats, vinyl is a physical, mechanical medium. Records are etched with grooves, which impart vibrations through a stylus, which can then be amplified. In a way, it’s not that different from the way a microphone or electric guitar pickup transmits the vibrations of a string or voice.
Therefore, like a musical instrument, a turntable needs to be set up properly to achieve optimal performance. “Unless you set up the turntable correctly, you're not hearing what vinyl is all about and hence, you're not really hearing your vinyl collection,” Micallef says. “However, it's easier to hear the differences between a properly set up table and one that isn't once your ears become accustomed to the sound of vinyl. It’s about subtleties.”
Optimizing a turntable is a step-by-step process, and while it doesn’t require a ton of tools, several of the steps can involve detailed measurements. We’ll stick to a basic overview, while offering some suggestions for further exploration.
Placing the Base
This one might sound obvious, but the location of the turntable’s base can affect its performance. A solid surface that prevents room vibrations from reaching the platter is a good starting point. Never sit the turntable on top of a speaker or stereo receiver. If walking around near the turntable makes the tone arm jump, for example, you should consider moving it to more solid footing. “Also, your turntable will reflect the sonic characteristics of what it’s sitting on,” Micallef says. “Glass will sound hard, wood will sound warm, etc.”
Also, be aware that “flat” and “level” don’t mean the same thing. Furniture and floors are often on a slight angle, and it’s worth checking and adjusting your turntable to compensate. “A level turntable will protect your records over the long haul and prevent groove-wear,” Micallef says.
While you may be able to get by with a household level, tools like the Audio-Technica AT615, which is specifically designed to check platter level, are relatively affordable.
Find the Manual(s)
It’s important to note that “ideal” setup varies by model. While all turntables basically do the same thing, they’re far from universal in the way they’re designed and built. The same is true of cartridges. Any adjustments you make need to line up with the guidelines for both your turntable and cartridge.
If you own (or are in the market for) a used turntable, you might find the info you need in the extensive free archive on vinylengine.com. You have to register to download the manuals, but registration is free.
RELATED ARTICLE

Cartridge Overhang
The cartridge can be the most critical element in getting good performance from your turntable. After all, this is the part that actually rides the grooves and transmits the vibrations that will be amplified through the turntable’s electronics, your preamp, and sound system.
The cartridge mounts via two screws to a component known as the headshell and sends signal through four wires—two for each channel. Many styluses are available pre-mounted in a headshell, which simply plugs into the tonearm.
Even if you’re using the cartridge that’s already mounted, it pays to check that the wires are connected correctly. The wires are color coded. Red (hot) and green (ground) are for the right channel. Connections for the left are white (hot) and blue (ground).
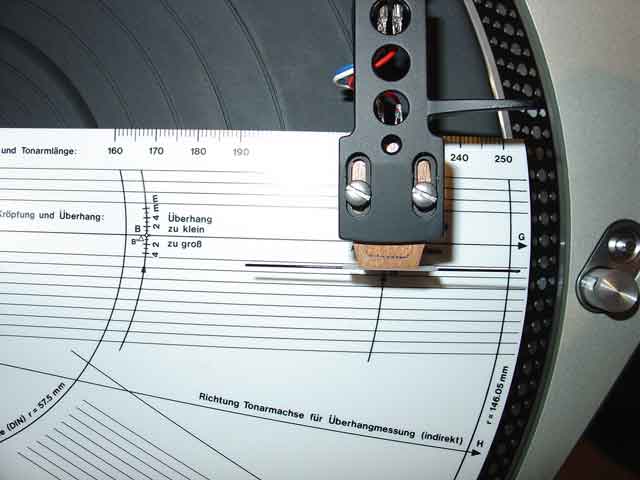
Adjust cartridge alignment
Photo from tnt-audio
The way the cartridge screws onto the headshell is also critical. The screws sit in two slots, which allows you to position the cartridge forward and backwards relative to the headshell.
The position of the cartridge should match the specifications for your tonearm and headshell. This is known as as the overhang distance, which determines where the stylus sits relative to the center of the album as it spins.
The correct measurement can be a matter of millimeters, and can be challenging without a standard ruler. “You might get better results more easily by using a guide or a cartridge alignment protractor, which is often included with the manual amid the packing materials,” Micallef says. You’ll find a guide to choosing the correct protractor for your gear at vinylengine.com.
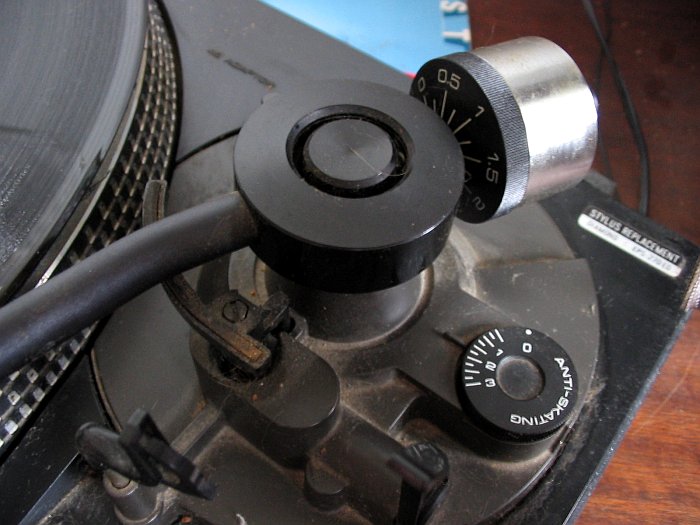
Tracking Weight
For best performance, the tonearm should ride the record’s grooves without either digging in too hard, which can prematurely wear both your vinyl and the stylus, or too lightly, which will cause it to skip even on pristine vinyl.
Here’s where the counterweight, the control on the back of the tonearm, comes in. Once again, you’ll need to do some research (or dig out the manual) to find the recommended setting for both your tonearm and cartridge.
“The tracking weight varies because arm and cartridge weights vary,” writes Paul Rigby on vinylfactory.com. “If the tracking weight on your stylus is too low, it will cause the stylus to jump and damage your record (which is why too low a weight is more harmful than too high a weight). If you set the tracking weight too high, the stylus will not track the grooves correctly, losing information while aural distortion will often be evident too and, again, there’s a possibility of record damage, over an extended period.”
Once you have the specs for your gear, however, setup is relatively easy: the dial on the tonearm counterweight adjusts to the correct tracking force. Most cartridges specify a range, not an exact setting. Rigby and others recommend starting somewhere in the middle of the range—i.e., if the range is between 1.6 and 2.0 grams, start at 1.8.
Tracking Weight
The range can vary not only by model, but by application. Recommended tracking force on a hi-fi oriented stylus like the Ortofon 2M Red (1.6 – 2.0g) is generally lower than with DJ-oriented cartridges like the Shure M44-7 DJ cartridge (1.0-3.0g). In fact, the Shure’s manual specifies different tracking force settings for DJ vs. hi-fi use.
“A lot of the vinyl that DJs play generally has a deeper groove and the higher tracking force allows for the needle to properly glide through the grooves with that clean crisp sound,” says Jessyka G. Becker (a.k.a. Army Girl), Toronto-area drum ’n’ bass DJ and radio host at 100.3 FM in Kitchner, Ontario. “The heavier tracking also means less pressure needs to be applied for scratching, which is one reason DJs also like banana-style cartridges.”
While adjusting the counterweight and tracking force, set the anti-skate—which we’ll get to in a minute—at zero. Then, remove any support from the tone arm so that it balances freely—but be careful not to let the stylus simply crash into the platter.
“Move the rear-mounted counterweight backwards and forwards along the length of the arm until the arm lifts off the armrest and freely (without any support from yourself) hangs in a level position,” he says. “Your arm now has an effective tracking weight of 0g.”
The next step is to set the tracking weight—a separate dial found on many tonearms and usually located on the counterweight—to zero as well. Basically, the counterweight compensates for the cartridge, and therefore defines your zero tracking position.
If your tonearm doesn’t have a tracking dial, things get a bit more complicated, but there are gauges that can help you such as the Shure SFG-2 Stylus Force Gauge available from Needledoctor.com. After zeroing the arm and setting the counterweight (or tracking force), dial to zero (the dial is present on most tables) and set the correct tracking force for the cartridge.
RELATED ARTICLE

Anti Skating
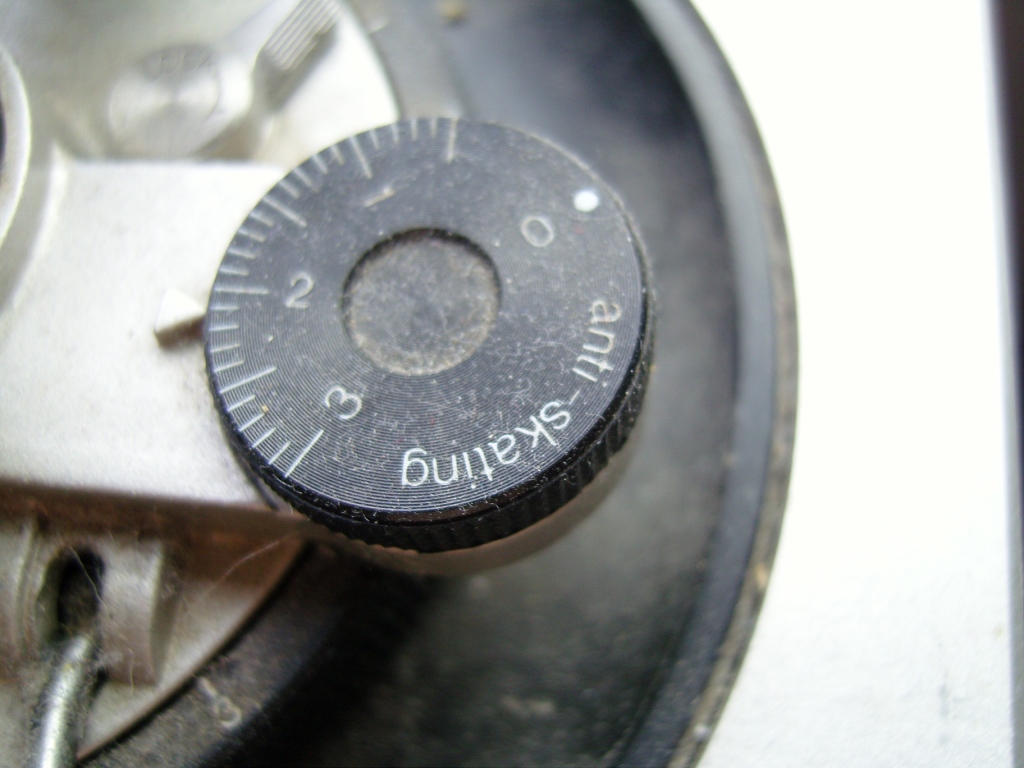
Anti-skating dial
Photo by filterchild
Now that you have the cartridge aligned and set for the tonearm, you can set the anti-skate, which keeps the stylus riding in the center of the groove and prevents it from being pulled across the record by gravity. This is important because the centrifugal force of the rotating record tends to pull the stylus to the inside of the groove. Fortunately, this isn’t a difficult job. “All you have to do,” Micallef says, “is set the anti-skate to match the tracking weight (or follow the recommended force in the manual), and you should be good.”
Vertical Tracking Angle
For optimal performance, you’ll want to set the vertical tracking angle (VTA), which governs how the stylus moves across the disc. “VTA can be heard in how it affects treble and bass frequencies,” Micallef says. “Azimuth affects left and right channel clarity.”
The steps involved are beyond the scope of the article but there are some good online tutorials.
“Basically, you want to make sure the tonearm is level or parallel with the record surface,” Micallef says. “If the cartridge is set correctly, you can use the tonearm position as a general guide. Grubscrews in the back of the tonearm will allow you to move the tonearm up and down, at least on better turntables. Generally speaking, if the back of the tonearm is too high, it will increase treble frequencies. Too low, and bass frequencies will be be more exaggerated. This adjustment is done visually, and by ear.”
As for azimuth, that is the direction of the cartridge within the headshell. The cartridge should sit at a perfect 90 degree angle to the record. This involves rotating the tonearm slightly.
Grubscrews at the back of the tonearm (in better turntables) will allow you to make this adjustment. Azimuth is usually done by eye; you can also use a small mirror sitting under the stylus to confirm the cartridge is as close to a 90 degree angle as possible to the record’s surface.
Turntables