The first installment of our "Making a Beat" series focused on using an AKAI MPC2000XL to sample vinyl records and produce a unique track. Today, we're diving in with a hybrid setup consisting of the same MPC2000XL, a handful of synths, and a drum machine. We're highlighting some key features of the MPC and also showing a preview of how to add the finishing touches in Ableton Live.
Hardware: System Design and Setup
The diagram below illustrates the technical schematic for this production rig. It starts with the same setup as last time: a Technics SL-1200 MK3 turntable connected to the MPC2000XL. Building upon that, we've added a Roland Juno-106S, Yamaha DX7, Novation PEAK, and Oberheim DX that all run through a Yamaha MG12XU Analog Mixer for audio monitoring. We're utilizing the Arturia Interface for playback, synchronization, and recording.
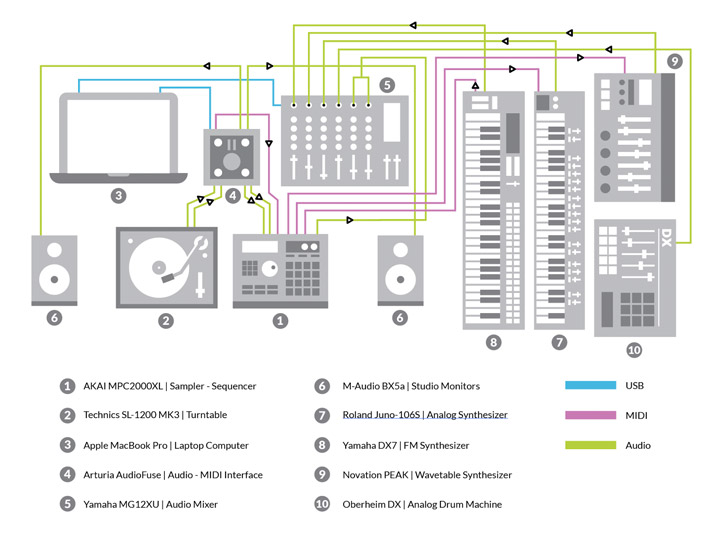
In the diagram, signal flow is represented by directional arrows, illustrating the configuration of the hardware: Audio patching, USB connections, MIDI paths for the controlling, programming, and playback of the synths, and MIDI Beat Clock synchronization routing.
MPC2000XL: Sampling and Sequencing
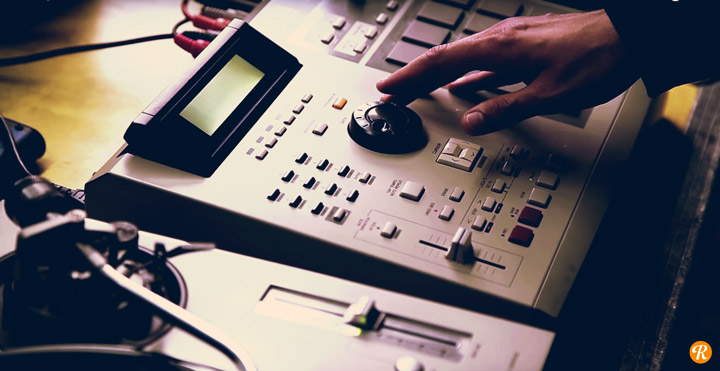
Sampling and sequencing with the MPC2000XL is straightforward and streamlined. All of the machine’s page menus and most of its functions can be accessed through the telephone keypad in the the upper left-hand corner, indicated by the blue buttons.

The addition of 4 bank keys of 16 pads allows quick accessibility to the samples via my personal organization preferences: hi-hats and cymbals in bank A, kick drums in bank B, snares and claps in bank C, and vocals in bank D.
The XL swivel screen and level surface design improves productivity by eliminating the need to hunch over, making extended sessions working with this machine much less fatiguing.
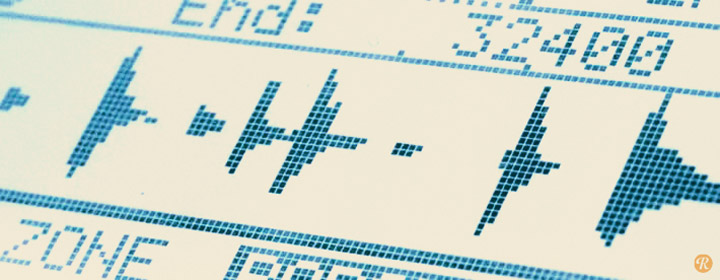
Graphical waveform audio editing — a benchmark feature first introduced in the 2000 series of the MPC model line — enhances workflow efficiency, significantly improving upon the truncation-by-numbers editing procedure of previous models.
In previous models, changing the speed of a sample worked just like a turntable does, with speed and pitch intrinsically linked. New to the XL, time-stretching and sound slicing allows you to work more directly with just the standalone unit, changing the speed of samples without drastically modifying the pitch. I used this feature on the main beat loop I sampled.
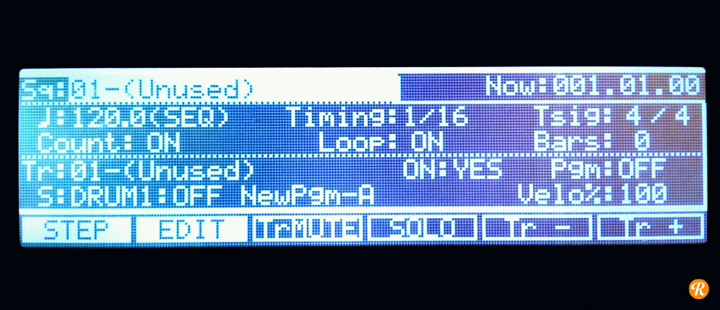
After the drum sounds are sampled, assigned to pads, chopped up, and their playback preferences are selected, sequencing them begins by navigating to a unused sequence on the main screen. This is where setting up the BPM, quantization timing, and the amount of bars for this beat loop are selected.
This MPC doesn’t have the optional 8-out audio routing board installed, just stereo outs. So while programming the sounds, I use an internal method of mixing-while-I-work by changing the velocity of the individual programmed parts, which are accessible in the track section of the main sequence screen.
The track mute feature is something I use while programming the various parts, as it allows me to mute many tracks at the same time. It's a great way to come up with ideas for later arrangements in Song Mode.
The velocity sensitive pads on the MPC are responsive enough to be played with drumsticks, yet tactile enough to be played with fingers. A performance-based controller, sampler, and sequencer integrated into a compact standalone device allows musicians to interact with digital music sequencing in new ways.
As a lifelong percussionist, I have always been drawn to the innovative performance design of the MPC. I can play and record the parts just how I hear them in my head, without having to figure out where that is on a standard step-sequencing grid.
I begin by finger-drumming ideas on the pads until I come up patterns that I want to use. Then, I start programming each individual sound on separate tracks in the sequence. This is a good production habit to have in general, as it allows for the soloing of sounds during pre- and post-production.
Synthesizers: Sounds and Playback
The MPC2000XL can control any drum machine, synthesizer, or other device that uses standard MIDI messaging for cross-device communication. It has two MIDI ins (1 - 2) and two MIDI outs (A - B).
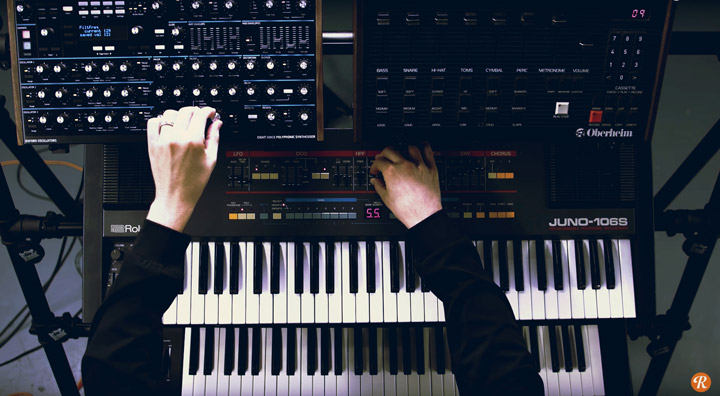
In this production rig, a vintage drum machine sits alongside a modern wavetable synthesizer that includes the addition of classic analog and FM synth sounds. The Yamaha DX7 is used as a controller routed directly to the MPC MIDI input, with the MPC MIDI outputs routing to the Novation PEAK (MIDI out A) and the Roland Juno-106S (MIDI out B).
I like to play and program synth patterns with electronic piano sounds first, then scroll through patches on the various synths until I stumble upon something unexpected. Sometimes, this inspires me to write the pattern differently or just keep it for pattern doubling with another patch.
Roland Juno-106S was my first poly and is one of the most versatile and affordable vintage analog synths on the market today. I used this for the synth bass sound — Bank A | Patch 55.
The Yamaha DX7 electric piano is a favorite of mine from this iconic, sound-of-the-'80s, FM classic. I used this as a controller, as it has the best keyboard action out of the synths chosen for this rig.
Novation PEAK is the newest synth featured here and a welcome addition, with its modern take on wavetable synthesis. I used this for the main pad chords.
The Oberheim DX Drum Machine is a pre-MIDI-era drum machine that decidedly doesn’t sound electronic. The DX snare drum is my all-time favorite machine snare. I sampled it and used it for that deep, mid-range punch.
Song Mode: Function and Arrangement
The MPC's Song Mode is where all the variations of that initial loop you've created, across multiple sequences, are organized. All the standard musical arrangement concepts exist here — how many times which sequence repeats and in what order this transpires.
Once I have a musical loop created that I am ready to arrange, I copy and paste that main sequence to other unused sequences and make variations of them.
I use Song Mode for its ability to illustrate what sequences I need to remove or repeat, as well as indicating what areas in the beat need bridges. It takes me out of the loop-based production mode and most closely mimics the linear visual arrangement format of a DAW.
Hardware To Software: Syncing and Recording
Getting the multi-tracks of this project into a DAW for further production requires synchronization from the hardware to the software. MIDI Beat Clock is enabled on the MPC with the master clock being sent from Ableton Live.
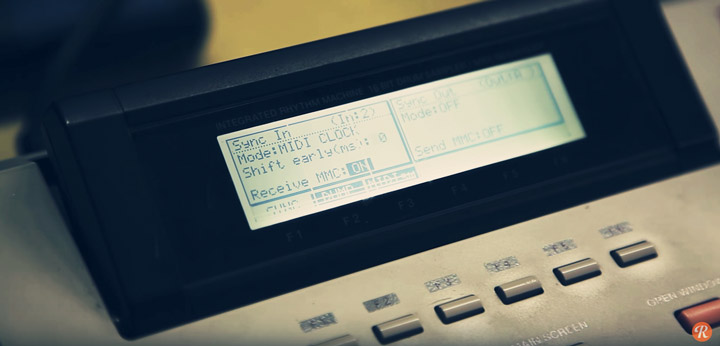
MPC2000XL Setup: Navigate to the Sync menu, enable the MPC to Sync In via external MIDI Beat Clock, and select the MIDI input channel. In this setup, MIDI in 2 is the input channel for MIDI Beat Clock.
Ableton Live Setup: Go to Preferences, select the MIDI / Link tab, choose the port and enable Sync. Ableton Live will now control the MPC through MIDI Beat Clock synchronization.
The multi-tracks of each sound get routed to record-ready audio tracks in Ableton Live via the AudioFuse interface. They are ready to be tracked in the software once MIDI Beat Clock synchronization is locked. The audio for each sound is then recorded onto separate channels in the software, and this project is now ready for post-production.
For certain sounds — like the Novation PEAK pad sound used here — I will track out the full length of the song in the software, as I want to capture certain performance elements, like filter sweeps and envelope modifications. For other transient sounds (like drums), I just track out a section or two for time-saving purposes and arrange them in the DAW later.
I also record the MIDI data for any part I have programmed with the synths, allowing me to layer more sounds with the MIDI patterns in the software.
Ableton Live: Finishing It Off
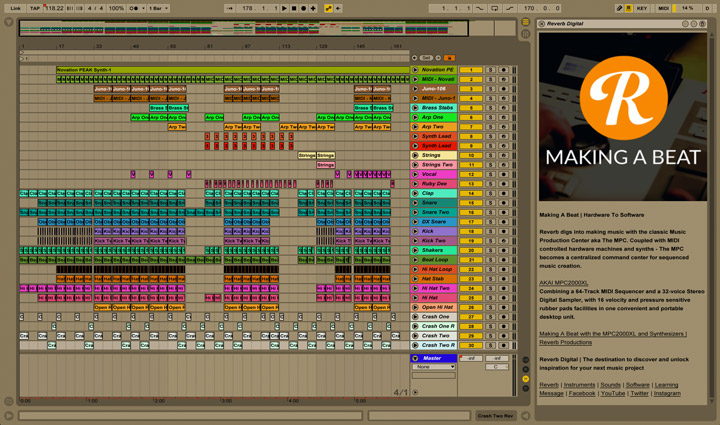
The beat from the video was put into Ableton Live 9, where effects processing plugins were added, virtual instruments were layered, and supplementary samples were incorporated. Everything was also arranged, and, finally, mixed down.
The session preview image below illustrates what this final project looks like in Ableton Live, including all of the additional production I described. It also includes a color-coding system that I employ to assign certain colors to sonic qualities of the sounds.
You can listen to the final version of this beat to compare what you hear in the video to this production version below. And if you like what you hear, you can download it for free here.
If you want to learn more about incorporating hybrid production methods into your studio, or just want to talk shop, please don’t hesitate to reach out to [email protected].