Classical guitarists and rock guitarists tend not to mingle too much. While there are some exceptions—The National’s Bryce Dessner, who trained as a classical guitarist, is one of the rare players that sits in both camps—for the most part the two don’t mix.
But there are definitely techniques and tricks that rock players can borrow from their classical counterparts. After all, the classical guitar has existed in some form or another for almost 500 years—classical players have definitely had time to think about how to approach the instrument.
From finding a new resting position for your fretting hand to bringing chords into your solos, what follows are suggestions that can help open new worlds in your playing. I recommend taking your time and playing around with these ideas—as with any new musical concept, practice makes perfect.
A New Angle for Your Fretting Hand
One thing to experiment with is the angle of the fretting hand. Most players tend to wind up in the “G major claw,” aka, the angle that most players automatically make for a straightforward G major chord. This holds true, generally, even if they’re playing high or low on the neck.
A standard classical approach, however, looks a little different. Francisco Tárrega, the "father of the classical guitar" and possessor of terrific facial hair, demonstrates perfect left-hand technique in this picture:

Notice how the hand aligns with the frets. It makes the pinky a lot easier to use, since it can actually reach all of the notes. While the G-major approach works perfectly well for an awful lot of playing, this classical position can help you more easily fret chords and play melodic passages outside of your comfort zone.
You don’t have to use the classical left-hand position for everything (in fact, I’d recommend using both, depending on what and where you're playing), but it certainly opens up your options.
Ornate Fingerpicking Patterns
It might seem a little obvious, but in classical guitar-playing, you use your fingers. While some rockers certainly make great use of fingerpicking as well, there is a huge range of patterns and techniques that rock guitarists can learn—if they know just the very basics of reading music.
The combinations your fingers can execute extend far beyond Carter Family Picking or rudimentary folk patterns. But to learn the patterns, you'll need to know how your picking positions are written on a piece of music. From the thumb to the ring finger of the picking hand, they’re often noted like this:
- p for pulgar (thumb)
- i for indice (index)
- m for medio (middle)
- a for anular (ring)
The pinky usually isn’t used, simply because with conventional classical technique it can be difficult to reach the strings, though that certainly hasn’t stopped some players.
In the link here, you’ll find the first 20 of Mauro Giulani’s 120 right-hand exercises from Studio per la Chittara, Op. 1—essentially a massive collection of exercises and technique drills. Even if you can’t read music, the right-hand patterns Giuliani uses are simple enough that you can follow along. They do get trickier, though.
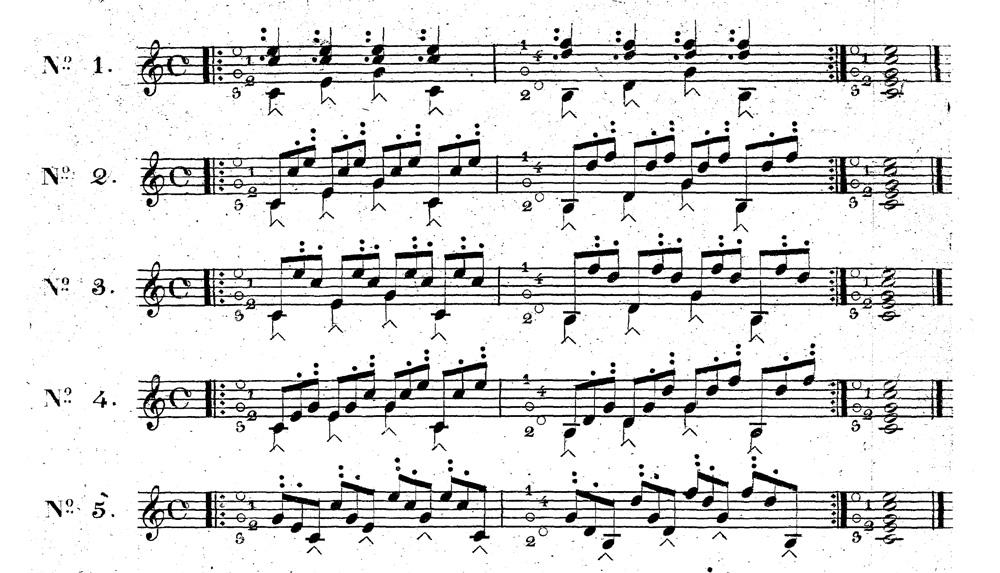
If you’re up for some brain-bending right-hand work, the complete book is available here. (Word of warning: This edition is from the early 19th century, and uses dots instead of the commonly accepted pima system—an arrow is the thumb, one dot is the pointer finger, two dots represent the middle finger, and three represent the ring.)
Different Strokes for Different Tones
One thing that classical guitarists play around with a lot is the way that their fingers attack the strings. While rockers may tweak their amps or pedals before changing the way they hit the strings, even minuscule changes can make a big difference. Given that classical players can’t twiddle a dial, all the changes are in the hands.
There are two distinctions that classical guitarists make when striking a note—where the fingering hand is placed and how the picking finger follows through. A free stroke (tirando) lets the finger pass freely over the next string after it strikes, while a rest stroke (apoyando) has the finger rest on the next string.
Rest stroke may be familiar to rock guitarists, because it's the way that a lot of bass players use their right hands. But the same technique can add a punchier, fatter sound when applied to guitar. Because most players use free stroke 95 percent of the time, being able to deploy a rest stroke at will may be tricky at first. But once you have it down, it can add power and volume to your sound.
You can apply the same concept when using a pick—passing through the string to rest on the next string is going to get you a slightly bigger sound. But another huge determining factor to a guitar's tone that classical players use to great effect is the starting position of the right hand—closer to the fingerboard or closer to the bridge.
Sul tasto is an Italian term for when you play closer to the fingerboard, which will give a darker sound. Sul ponticello is when you play closer to the bridge for a brighter or more nasal sound. Some rock players use this method already—Television’s Tom Verlaine is known for varying his positions, and, uniquely, will also use the brighter bridge pickup while playing the darker-toned sul tasto.
Using Chord Melodies in Your Solos
Most rock players tend to use single notes in their solos, but that’s not the only way to do it. Classical solos, as in the adagio section of the "Concierto de Aranjuez," mix everything together—single-note melodies, complicated right-hand picking, and chords. If you've never seen a performance of the song, watch Spanish Flamenco great Paco de Lucía take on the fiendishly difficult solo here (starting around 6:45, with a climactic run around 8:05):
By placing the chord shapes higher on the neck, you can take a completely different approach than a standard pentatonic lick.
Imagine a melody rising up the neck accompanied by a chords underneath acting as a counterpoint to the melody. This is completely doable by simply trusting your ear, but knowing how chordal inversions fit together and how harmony works will certainly make your life easier if you want to tackle this approach.
Inversions aren’t too scary, since it’s just that the notes of a chord are swapped around. The same chord—say, G major—may take a different shape higher on the neck, but it's all the same notes (in this case, G-B-D). Once you find your new shapes, you can place the melody on top.
For an example of how much this approach can totally change the sound of some basic chords, try listening to Francisco Tárrega’s "Adelita" and realize that it’s mostly just a I-IV-V progression. These are the same chords as in a standard blues pattern, but it certainly doesn’t sound like it.